Emergency Plumbing in Tacoma & Pierce County 24/7 Live Answer Free Second Opinion Quality Plumbing Services
Emergency Plumbing in Tacoma & Pierce County 24/7 Live Answer Free Second Opinion Quality Plumbing Services
Emergency Plumbing in Tacoma & Pierce County 24/7 Live Answer Free Second Opinion Quality Plumbing Services
Emergency Plumbing in Tacoma & Pierce County 24/7 Live Answer Free Second Opinion Quality Plumbing Services
Text Us: 253-231-7015
Call Us: 253-231-7015

Installing a shower, whether a pre-formed kit or a custom build, requires meticulous attention to waterproofing and secure pipe connections to prevent leaks. The key to a long-lasting, leak-free finish is proper surface preparation, using the correct materials, and testing the system thoroughly before finalizing the walls.
A shower installation involves more than most people expect. Done right, it keeps water where it belongs and lasts for years without problems. Done wrong, it leads to hidden leaks, mold, and expensive repairs.
At Spartan Plumbing Inc., we’ve installed showers in countless Tacoma and Pierce County homes. We’ve put together this guide based on what we’ve learned over the years so you know exactly what goes into a leak-free installation.
Before any work begins, take stock of what you’re working with. Measure your shower space, including width, depth, and height. Check for visible water damage, mold, or soft spots in the floor.
Note the location of existing plumbing, such as the drain, water supply lines, and valve. Decide whether you want a prefab insert or custom tile shower, and set a budget that includes materials, labor, and a buffer for unexpected issues.
Water stains on walls or the ceiling below the bathroom often indicate hidden leaks. Musty odors suggest mold may be growing behind walls. Cracks in tiles, grout, or fiberglass signal that seals are failing. Rust or corrosion on visible pipes means they may need replacement.
If you find signs of water damage or mold, have a professional inspect the area before proceeding. Hidden damage behind walls can complicate installation and needs to be addressed first.
 Your choice affects cost, installation time, and long-term maintenance. Understanding the differences between your options helps you pick the right shower for your budget and lifestyle.
Pre-fab units are one-piece or multi-piece enclosures made from fiberglass or acrylic. They install faster and cost less than custom options. Design choices are more limited, but they work well for straightforward replacements where the existing plumbing stays in place.
Custom showers are built piece by piece using tile, stone, or other materials. They require a waterproof membrane system behind the walls. You get more design flexibility, but installation takes longer and costs more. Proper waterproofing is critical and requires skilled labor.
Research styles and materials online or visit showrooms to see options in person. Get accurate measurements to confirm your chosen shower will fit. Compare costs for both materials and installation before making a decision.
Proper preparation prevents problems down the road. Taking the time to get the space ready before installation begins makes the rest of the project go smoother and helps avoid surprises.
Clear everything out of the bathroom. Remove towel bars, shelves, and accessories near the shower. Protect flooring and fixtures outside the work area with drop cloths. Open windows or set up fans to ensure good ventilation during the project.
Removing the old shower unit safely takes experience, and some areas have regulations about disposing of old materials. Once the old shower is out, the area behind it needs inspection. Rotted subflooring, mold growth, or deteriorated plumbing are common in older homes. These issues need to be repaired before the new shower goes in.
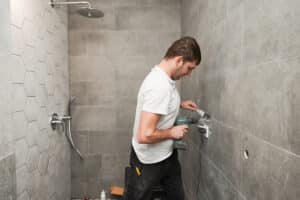
This step involves the pipes, drain, and valve that connect to your new shower. It’s where professional experience matters most.
The water supply to the bathroom gets shut off first. Old plumbing fixtures come out, and existing pipes are inspected for corrosion or damage. Worn supply lines or corroded fittings should be replaced at this stage.
If the new shower has a different layout, the drain or supply lines may need repositioning. The shower valve gets installed at the correct height and depth, and all connections are pressure tested before the walls get closed up.
Plumbing mistakes at this stage cause leaks inside walls where you can’t see them. Water damage from hidden leaks is often extensive by the time it becomes visible. This is the step where cutting corners leads to the most expensive repairs later.
 The base is the foundation of your shower. It has to be level and properly supported. Getting this step right prevents drainage issues and protects the floor underneath from water damage.
Some bases require setting on a mortar bed. A level confirms the base sits flat with the proper slope toward the drain. If the floor is uneven, leveling compound may be needed. The drain assembly connects with proper seals, and drainage is tested before proceeding to the next step.
A base that isn’t level causes water to pool instead of drain. Standing water leads to mildew, mold, and premature deterioration of the base material. Improper drain connections cause leaks below the floor that damage the subfloor and any rooms underneath.
This is the most important step for a leak-free finish. It’s also where most DIY installations fail.
For custom showers, a waterproof membrane goes on the walls behind the tile. All threaded pipe connections get wrapped with plumber’s tape. Joints are sealed with silicone caulk rated for wet areas. Every potential entry point for water gets attention because moisture that gets behind walls causes mold growth and structural damage.
Our region’s humidity makes proper waterproofing especially important. Moisture lingers longer here than in drier climates, and small gaps in waterproofing that might go unnoticed elsewhere can lead to serious problems. Membrane systems have to be installed correctly to work as intended.
Whether you’re using prefab panels or tile, the walls need to be square, plumb, and sealed. Proper wall installation keeps water contained and gives your shower a clean, finished appearance.
Panels should fit tightly against each other and the base. Seams get sealed according to manufacturer instructions. Fasteners and adhesive have to be applied correctly for the panels to stay secure over time.
Tile gets set on properly waterproofed backer board. Grout lines should be consistent and fully filled. Corners and edges require careful attention because these are common failure points.
Glass doors or enclosures need to be installed square and level. Panels that aren’t aligned properly look crooked and can allow water to escape. All edges and seams get a final seal to complete the water barrier.
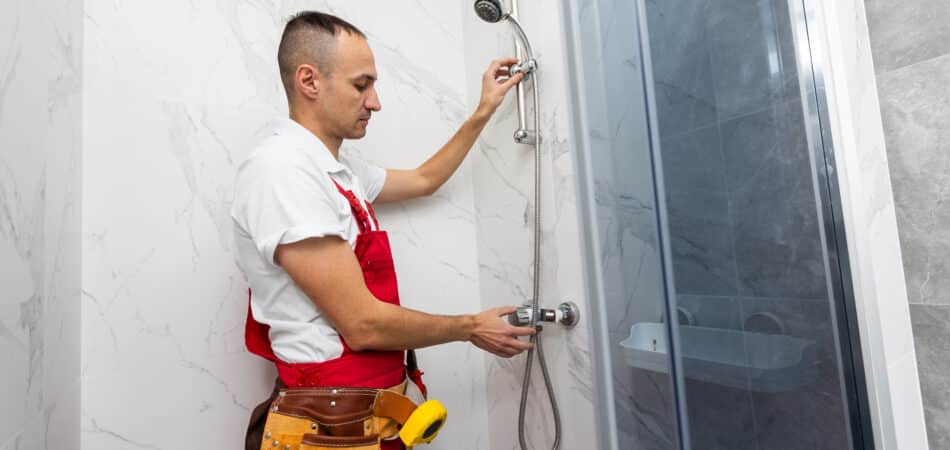
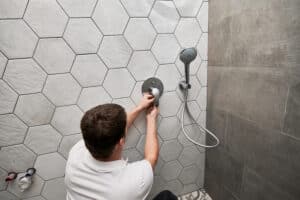
 This includes the showerhead, handles, and any accessories. Some of these tasks are simple enough for homeowners to handle, while others involve plumbing connections that require professional expertise.
Attaching a new showerhead to an existing arm is straightforward. Installing basic accessories like grab bars into wall studs or adding corner shelves doesn’t require plumbing skills.
Connecting fixtures to the valve involves plumbing connections that need to be done correctly. Body jets, multiple showerheads, and digital or thermostatic controls require professional installation. Any work involving water supply connections should be handled by someone with experience.
Never skip this step. Testing catches problems before they become expensive repairs.
Run the shower at full pressure for several minutes. Check every connection, joint, and seal for drips. Look at the drain to confirm water flows freely without pooling. If you can access the ceiling below, inspect it for any moisture. Verify that water temperature and pressure are consistent throughout.
Don’t ignore any leak, even a small one. Tighten connections if they’re accessible. If the leak is coming from behind the wall or under the floor, call a professional. Small leaks don’t fix themselves and always get worse over time.
 A properly installed shower lasts for years with basic maintenance. Taking a few minutes each week to care for your shower helps you avoid costly repairs and keeps it looking and functioning like new.
Wipe down surfaces after use to reduce moisture buildup. Clean drains monthly to prevent clogs from hair and soap. Inspect grout and caulk every few months for cracks or gaps.
Reseal joints when you notice wear or discoloration. Check fixtures for drips or loose handles. Run the exhaust fan during and after showers to reduce humidity in the bathroom.
Mold or mildew that keeps returning despite cleaning suggests moisture is getting somewhere it shouldn’t. A musty odor even when the shower is dry indicates hidden mold.
Soft spots in flooring near the shower mean water is getting under the base. Water stains on the ceiling below point to a leak. Grout that’s crumbling or falling out means seals are failing and water may be penetrating the walls.
Addressing small issues early prevents them from becoming major repairs.
While some parts of shower installation are manageable for experienced DIYers, certain tasks require licensed plumbers.
Attempting these tasks without proper training often leads to hidden leaks, code violations, and warranty issues. The cost of fixing a failed DIY installation usually exceeds what professional installation would have cost in the first place.
Following the right steps leads to a shower that performs well and lasts for years. While this guide gives you a clear picture of what’s involved, the plumbing, waterproofing, and precision work often call for professional experience.
If you’d like help with your shower installation project, Spartan Plumbing Inc. is here for you. Call us at 253-260-3745 or book online for a free estimate.
We’ll walk you through your options, explain what’s involved, and provide honest, upfront pricing.
Some homeowners with experience can handle portions of a shower installation, particularly prep work, demolition, and maintenance. However, plumbing connections, waterproofing, and leveling the base require professional skills and tools. Mistakes in these areas cause problems that aren’t visible until significant damage has occurred.
A shower insert is a prefabricated enclosure made from fiberglass or acrylic that fits into an existing space. Custom showers use tile, stone, or other materials installed piece by piece with a waterproof membrane system. Inserts cost less and install faster. Custom showers offer more design flexibility but require skilled labor.
Replacing an existing shower in the same location typically doesn’t require a permit. Adding a new shower, moving plumbing lines, or making structural changes usually does. Check with your local building department to confirm requirements for your project.
A straightforward replacement using a prefab unit can often be completed in one day. Custom tile installations or projects involving plumbing modifications typically take several days to a week.
Maintain your shower by regularly inspecting grout and caulk, keeping the drain clear, checking that fixtures are tight, and resealing joints when you notice wear. Good ventilation also helps by reducing moisture buildup.
Common signs include persistent mold or mildew that returns after cleaning, cracked or chipped tiles and grout, water stains on the ceiling below, soft or spongy flooring near the shower, and visible leaks around the base or fixtures. If you notice any of these, it’s worth having a professional assess whether repair or replacement makes more sense.
The cost varies depending on several factors, including the type of shower you choose, whether plumbing needs to be relocated, the condition of existing pipes and subflooring, and your choice of fixtures and finishes. Getting a written estimate before work begins helps you understand exactly what you’re paying for.
Yes, tub-to-shower conversions are a popular option for homeowners who prefer showers or want easier accessibility. The project typically involves removing the tub, adjusting the drain location, installing a shower base, and adding appropriate wall panels or tile. This type of conversion usually requires professional plumbing work.
The right showerhead depends on your preferences and water pressure. Fixed showerheads mount directly to the wall and offer a simple, reliable option. Handheld showerheads provide flexibility for rinsing and cleaning. Rainfall showerheads deliver a wider spray pattern for a spa-like experience. Some homeowners opt for multiple showerheads or body jets for a more customized setup.
A properly waterproofed shower keeps water from penetrating walls and floors. Signs of waterproofing failure include mold or mildew that keeps returning, musty odors, soft spots in nearby flooring, and water stains on ceilings below. If you suspect waterproofing issues, have a professional inspect the shower before the damage spreads.